Are you thinking about how to start a blog easily, and looking for an easy and simple guide?
Well, I know that’s why you are here, and I assure you that this guide will be different from all of the other available content on the internet.
Hi there, I’m Shrey Kajaria, and I’m going to share my best to-do checklist with you all which I have created after being in this blogging field for more than 5 years.
I have already faced major ups and downs in this field and as per my experience, I have created this checklist that will surely help you to start your blogging journey very easily and take your new blog to the next level!
Why am I saying so?
I started a micro-niche blog in February 2022, and it only has 14 articles on it. This particular blog generates an average of 2,000 organic visitors per month.
I’m going to share my personal checklist and my personal work plan that I followed on this blog.
And I don’t think I need to say much more about it as the results say everything
So, First of all, I would like to welcome you to the Blogging Community & Congratulate you for choosing this wonderful career.
Before we start, let me tell you something about the blogging mindset that you need to maintain throughout your blogging journey.
As many bloggers don’t talk about mindset and it’s really important for you to know and create your mindset according to it, otherwise you won’t be able to continue your blogging career in the long term.
And after that, we will talk about blogging what it is, how much bloggers earn every month doing blogging, and whether it is really profitable nowadays.
So first let’s start with the most important thing in blogging which is mindset.
Mindset Before Starting Your Blogging Journey.
I have read hundreds of articles on the internet but only a few talk about the actual blogging path, the rest of the article is just full of affiliate promotions and all.
Also, no one talks about the mindset, and first, it’s really important for a beginner to understand what blogging is and prepare their mindset according to it.
Let me clear it up, blogging takes time, patience, and yes a little bit of investment but not too much.
Blogging is a business and just like every business, we need some time to understand how it works, like how the search engine’s algorithm works, and how the articles are ranked in SERPs (Search Engine Results Page).
Even if you get knowledge from any other articles or maybe from some paid courses, you won’t be able to achieve those results in a few months.
They have worked for years and after lots of research, experiments, and ups and downs they got those results.
So it’s important for you as a beginner to understand that blogging takes time, at least 6-8 months.
Assume a blog that is 5 -10 years old and has already ranking on Google for years, and you as a beginner with a 4-6 months old blog will beat them.
Well, this might be possible practically but not theoretically, you need to work hard and understand why that blog is ranking on Google and what you need to do to grab that position.
Success can be achieved by following two words, “Hard Work” and “Consistency”.
– Shrey Kajaria
My main motto behind sharing these lines with you is, don’t take blogging easily, and also not that tough though.
Alright, now let me tell you more about blogging.
What is a Blog or Blogging?
When we talk about Blogging, is the art of creating articles, photos, videos, or any other type of content and publishing it on the internet, mostly on a website.
A blog is a website on which we create and keep content, mainly written content.
So, this was a simple meaning of a blog and blogging, now let’s have a look at how much other reputed bloggers earn, so you will get some interest and also some inspiration.
How Much Money Bloggers Make Per Month & How Much You Can Make?
No one can answer this question as it has no limit.
Many expert and reputed bloggers are earning an average of $15,000 to $20,000 per month.
Popular bloggers like Neil Patel, Brian Dean & Adam Enfroy are making an average of $150,000 per month through their blogs and other businesses related to it.
And if you are thinking about whether blogging is profitable in India and how to start a blog in India?
Then let me tell you that many of our Indian bloggers like Amit Agrawal, Harsh Agrawal, Pritam Nagrale, and many more are earning more than $20,000/ month.
Many other unknown bloggers around the world are earning more than $50,000 per month, you can check out their blogs for their income reports.
The reason behind sharing this with you is to let you know the earning potential of blogging and get a little bit motivated to start your own blog and make an online money-making stream easily.
I also earn an average of $200/ month. I know the amount is not that big but I also haven’t worked that much on my blog.
But now I have created a work plan to take this blog to a great level and make at least $1000/ month by the end of 2024.
So, it’s clear that blogging is still beneficial to start and always will be.
Alright, now without wasting any time let me share my 13 Steps Checklist to Start a Successful Blog.
How to Start a Blog (13 Steps Checklist)
- Select the Perfect Niche for Your Blog.
- Create Content Calendar & Work Plan Blog Post Topics. (My Personal Work Plan 😉)
- Choose the Best Platform: WordPress Or Blogger?
- Find the Best Domain Name & Web Hosting.
- Install WordPress on Your Hosting.
- Pick Up the Best WordPress Theme & Plugins for Your Blog.
- Set Up Some Essential Pages.
- Connect Your Blog to Webmaster Tools And Analytics.
- Keyword Research for Your Blog Posts.
- Create Engaging Content and Optimize with On-page SEO.
- Create an Online Presence: Off-page SEO.
- Monetize Your Blog with Professional Ways.
- Analyze And Track Your Performance.
So, this is my best & simple 13 steps to start a new blog in 2022. Now we will discuss these steps in detail.
We will start with the 1st step, the selection of the perfect niche for your blog.
Step 1: Select the Perfect Niche for Your Blog.
The most important step before starting a blog is selecting a topic, and it’s the main step before starting a new blog.
This is the major mistake every new blogger makes, even I have made at the beginning of my blogging career.
Obviously, you need to select a topic on which you will write about.
A newbie blogger is not aware of the competition and the audience of the topic and then they select a highly competitive niche, and that’s the major reason behind the failure of a blog.
Many bloggers will suggest you select a niche in which you are interested and it’s not a good way to select a niche for your blog.
To some extent, it’s fair to select a niche in which you are interested but we are talking about blogging and making money from it, and not every niche is profitable.
So it means that you need to select a niche that has low competition, good earning potential, and in which you are interested.
I have shared an article on 18+ High CPC Niches For AdSense that may help you in deciding the best profitable niche for your blog.
You can choose a niche according to the hobbies in which you are interested and the experiences that you have gained.
For example: If you are interested in sports then write about your favorite sports, you can share your past experiences, tips & tricks, and how-to guides.
So, it completely depends on you, but try to work on a niche in which you have at least some knowledge and which has less competition, if you are new to blogging.
I would suggest you select a niche in which you can write at least 50 – 60 articles every year, and write at least more than 800-1000 words in every article so that you can explain every important detail.
Through this, you will be able to provide great content to your blog readers and it also helps in the search engine rankings of your articles. With this, we will move on to step 2.
Step 2: Create a Content Calendar & Work Plan Blog Post Topics.
It’s really important for you to create a content calendar and a work plan for your blog to run successfully, and this is why every new blogger fails to provide content on a regular basis.
What is a Content Calendar?
In simple words, a content calendar is a schedule you create to decide when and which blog post you will publish on your blog.
Before starting a blog you must create a content calendar for a whole year. Then you will just need to write and publish those blog posts.
So you must note down 50+ topics on which you can write and the date on which you will publish them.
Also, you don’t need to stick with these topics only, if you are able to find any other trending or interesting topic for your blog readers then you must publish that first and after that continue with your content calendar.
Now let’s talk about what should be your work plan for your blog.
My Personal Work Plan for A New Blog
As I said in the previous step you must have to select a niche in which you can create more than 50+ articles per year of at least 800 words each.
Let me make it simple for you, each year consists of 52 weeks, which means you need to write only one article per week, it’s not that difficult though, right?
Want it to be easier? Every week has 7 days, you need to write a brief blog post and it consists of at least 800-1000 words.
So that means you need to write only 120-140 words every day and it will hardly take half an hour or a maximum of 1 hour.
Now I think I made this task very easy for you, and this way you can easily create 50 and might be more than 50 articles every year.
And the blog stats that I shared at the beginning of this article, got after following this work plan only.
So let’s talk about the 3rd step, which is the best platform or which platform you must choose to create your blog?
Step 3: Choose the Best Blogging Platform: WordPress Or Blogger?
After creating a content calendar and work plan for your blog the next step is to choose the right blogging platform for your blog, this is really important to choose a perfect blogging platform.
There are hundreds of blogging platforms available on the internet to choose from, both free and paid options available to choose from.
If you want to start with a free one then I will recommend going with Blogger.com, It’s an amazing and completely free blogging platform by Google.
In fact, the blog (bloggingraptor.com) you are reading right now was started on blogger.com.
In blogger, you just need to connect your custom domain name and your blog is ready, and if you have good knowledge of HTML then you can customize it very well and make it look more professional, and you don’t need to buy anything else.
It has many restrictions that stop professional bloggers from using it, but it’s a really great and free platform if you don’t have enough money to invest in blogging, you can easily start your blogging career on Blogger and can upgrade according to your growth.
As I said, I started this blog on blogger.com and later shifted from Blogger to WordPress, after learning and earning some money.
If you want to go with the paid platform there are many options available, but as per my personal experience, all other successful bloggers will always recommend using WordPress.
It has many customization options and you can use different plugins to take your site to the next level.
So, again it depends on you whether you select Paid (WordPress) or Free (Blogger), and you must do proper research and decide which one is good for you.
I will suggest you go with WordPress as after some time you will need to migrate from Blogger to WordPress.
Now let’s jump into step 4 and select the best and most memorable name for your blog with good web hosting.
Step 4: Select the Best Domain Name & Web Hosting.
Till now you have selected your niche and platform.
Now the fourth step is to decide on a perfect, memorable, and relatable name for your blog, here the name of your blog should be directly or indirectly connected to your blog.
Example – This blog (BloggingRaptor.com) name directly shows that it is a blogging-related blog, similarly if you are thinking of starting a Technology Blog then in your blog name you must use the word Tech/Techy/Gadgets or any other technology word.
But before you decide on a name you also check whether the same domain name is available or not.
If the domain name is available with the (.COM/.NET/.ORG) extension then you can go with that name, but if not then must pick another name for your blog which is available with any of these domain name extensions.
After you select your best domain name, you need to buy the best web hosting for your blog.
Here, if you are starting your blog on a free platform like Blogger, then you only need to purchase a Domain Name, which you can get at a cheap price from GoDaddy or NameCheap easily, and then skip to the 7th step.
But if you want to use WordPress then you need a Web Hosting Plan for your blog.
Now you might be thinking about which will be the Best Web Hosting for your blog.
It seems very difficult to answer as there are hundreds of hosting providers available on the internet, but my go-through answer to this question is always HostArmada or Hostinger.
These two are really good at providing their services, and really great customer support too.
This blog (Blogging Raptor) is hosted on HostArmada, and I would suggest you go with HostArmada, as I have used more than 10+ web hosting services in the past for my clients as well as for my own blogs.
And the best experience till now is HostArmada, also if you want to buy any web hosting from Hostarmada then do refer to this page to get a flat 75% discount on any shared web hosting plan. Read Review
You can also try out Hostinger and get an additional 10% discount on any web hosting plan on Hostinger. Read Review
Also, I have shared a detailed list of 31+ Best Web Hosting Services to choose from don’t forget to check it out.
So now you have decided on the best name and web hosting for your blog, the next step is to install WordPress on your web hosting.
Step 5: Install WordPress on Your Hosting
After selecting and purchasing your domain name with web hosting the next step is to install WordPress on your hosting.
Installing WordPress is not rocket science, it’s very simple, you can get hundreds of video tutorials available on YouTube regarding How to Install WordPress on your hosting.
But below I have shared a simple step-by-step tutorial so that you can follow and create your WordPress blog easily.
How to Install WordPress Easily with Softaculous [Step-By-Step]
This is the best and simplest way to install WordPress on your web hosting.
I’m using HostArmada from this tutorial, so if you want to use HostArmada then first get it from here. Get HostArmada.
But if you are using any other web hosting service then don’t worry because the process is the same.
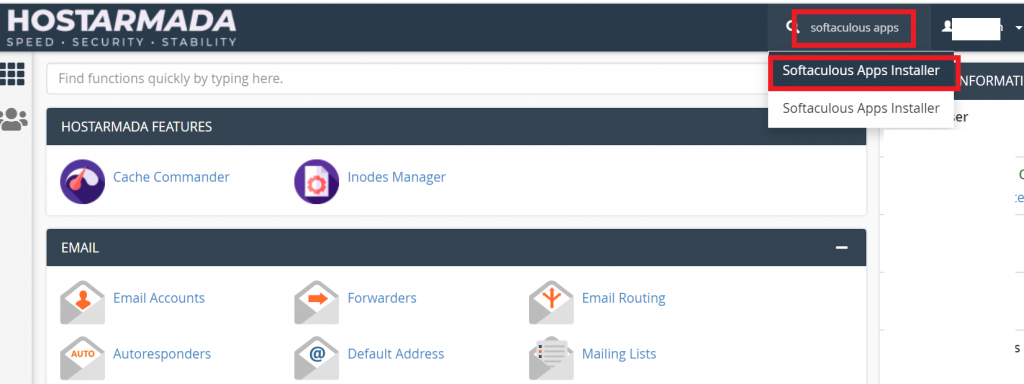
1. log in to Your cPanel, type “Softaculous Apps” in the top right search bar, and select “Softaculous Apps Installer” from the results.
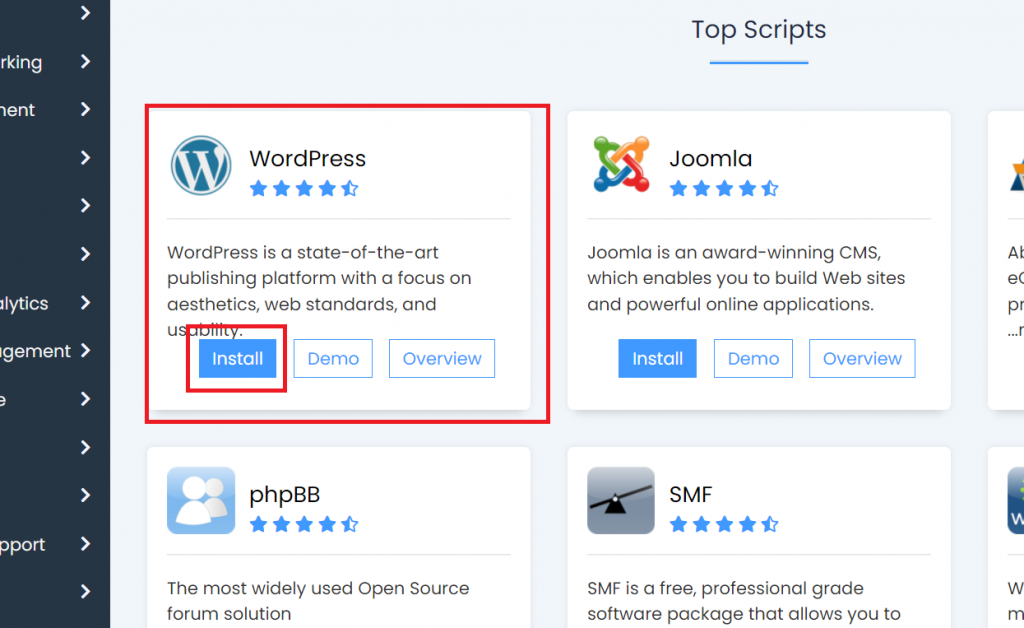
2. You will see the WordPress option on the top and the install button with it, so just click on the “Install” button.

3. You will see the “Software Setup” tab under it select “HTTPS://”, then select your domain name, and then select the “Latest Version” of WordPress.
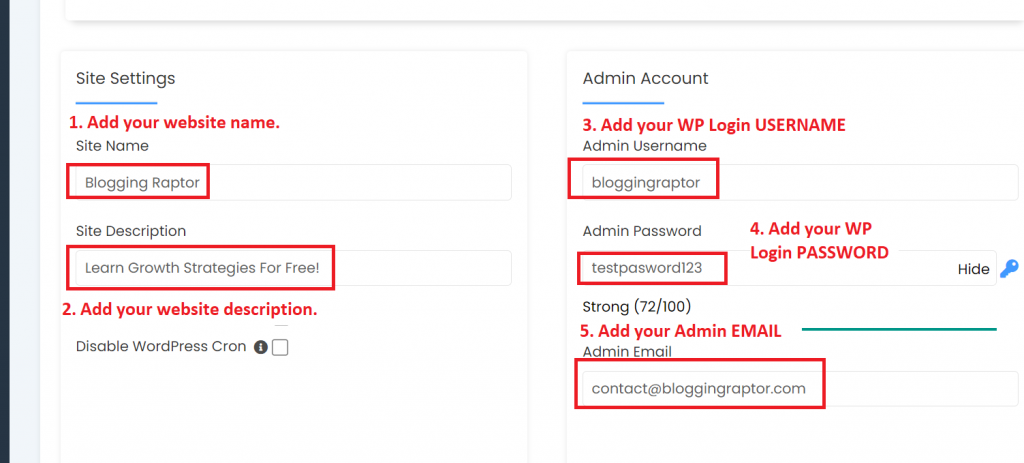
4. After that scroll down a bit, and you will see the “Site Settings” and “Admin Account” tabs, under it add your:
– Site Name (e.g: Blogging Raptor)
– Site Description (e.g: Learn Growth Strategies For Free!)
– Admin Username (e.g: bloggingraptor)
– Admin Password (e.g: testpasword123)
– Admin Email (e.g: [email protected])

5. Scroll down a bit, and you will see “Select Language”, “Select Plugins”, “Advanced Options”, and “Select Theme”. You just need to select the language of your site and ignore the other three options as we will select the best themes and plugins in the next step.

6. Scroll down to the bottom, and you will see the “Install” button, just click on it and wait for the completion of the installation process.
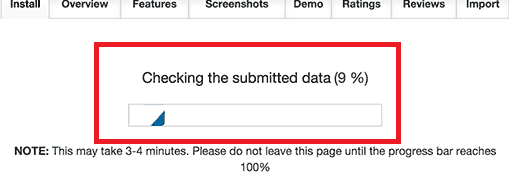
7. The WordPress installation process will take hardly 1-2 minutes.
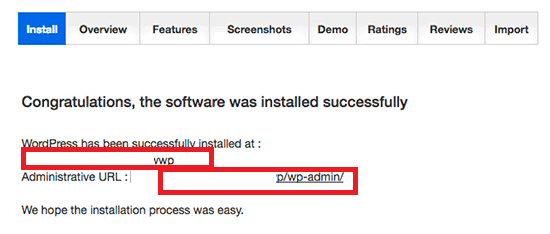
8. You will see a congratulations message after the completion of the installation process.
Congratulations, now you can visit your WordPress website by entering your domain URL in any browser, and now we will move on to the next 5th step.
Step 6: Pick Up the Best WordPress Theme & Plugins for Your Blog.
After installing WordPress on your web hosting the next step is to install the best and most suitable theme and important plugins on your blog.
First, we will talk about WordPress Themes–
This is also an important step as the UI (user interface), and the layout of your blog needs to be very good and easy to navigate so that the user gets what he/she looking for.
You need to select the best WordPress theme which has a nice look, is easy to navigate, is responsive, and most importantly fast loading.
You don’t need to make your blog look very Hi-Fi type by adding lots of animations, images, videos, etc. Just keep it simple and to the point.
Because your readers visit your blog just to read the articles, they haven’t come to see your blog design, they just want to read your article.
Best WordPress Themes for Beginners:
I personally use the Neve theme on this blog and it’s a really good, simple, lightweight, and responsive theme you can get it from here.
My top 5 favorite WordPress themes are:
– Neve. Get It Here
– Kadence. Get It Here
– GeneratePress. Get It Here
– Astra. Get It Here
– Blocksy. Get It Here
If you still don’t like anyone from these then you can visit the ThemeForest site, you will get hundreds of paid WordPress themes there to choose from, click on the below button to activate the best-discounted offers.
You can do good research on this and select the most suitable theme for your blog.
Now let’s talk about the WordPress Plugins–
Well, you don’t need to think much about plugins in the beginning, as you need to install them according to your blog’s requirements.
Important WordPress Plugins for Beginners:
I will suggest you install these 5 basic important plugins that will help you at the beginning of your blog.
Well, I have shared a detailed article on the Most Important WordPress Plugins to Boost Your Website.
WP Rocket:
WP Rocket is a cache plugin for WordPress websites that helps to make your website run faster.
It stores some files of your website so they don’t have to load again each time when someone visits it so this makes the website load faster. Even if you don’t know much about WordPress, you can still use it.
RankMath SEO:
This helps you to do the basic SEO of your blog, helps you to make changes in your system files quickly (so you won’t need to log in to your cPanel to make small changes ), and much more.
JetPack:
This plugin will help you to see the analytics and stats of your blog, direct social media sharing, commenting, backup options, security, and much more.
ShortPixels:
This plugin will help you to compress the images of your blog up to 90% with no quality loss, also it allows you to convert and present your images in WebP (the nextGen format) too.
WPForms:
This plugin will help you to create various types of forms like contact us, online surveys, newsletter forms, feedback forms, and much more very easily.
UpraftPlus:
You can create backups of your blog frequently, so if by mistake you delete something or you make some changes in theme files or .htaccess files due to which your blog’s design breaks or you lose some important files.
Then this plugin will help you to easily restore your backups with simple clicks.
Although these plugins have free versions with some limitations it’s really good to go as you are just starting off, and after getting some knowledge and earnings you can easily upgrade to their premium plans.
So, these plugins will help you to run and manage your blog easily without any issues at the beginning of your blogging journey, and you can install other plugins as per your requirements.
Now let’s move to the 7th step of starting a blog.
Step 7: Set up Some Essential Pages on Your Blog
Till now you have Installed WordPress, applied an awesome theme, and added important plugins to your blog. After that, you need to add some important pages that are there to be on your blog to provide a better understanding of your blog to your readers.
You need to add pages like:
About Us Page: It’s really important to tell your readers about you, your blog, and the content that you’re gonna share on your blog.
You can use the free About Us page generator tool to create an About Us page for your blog.
Have a look at my “About” page to get an idea.
Contact Us Page: Adding a contact us page is important too, whenever a reader wants to contact you related to any issue with your content, or maybe he/she has any good idea to help you in your blog’s growth.
You can use the free contact us page generator tool to create a Contact Us page for your blog.
That’s why you must have a Contact Us page/form on your blog so that the users can contact you directly through email or any other social media platforms.
Have a look at my “Contact” page to get an idea.
Privacy Policy Page: A privacy policy page discloses many policies like how you collect information, which kind of third-party services you use, data protection, and many more policies on your blog.
If you don’t know much about how to create a privacy policy page, then use this Free Privacy Policy Generator Tool to generate an awesome policy for your blog in a few clicks.
DMCA Page: Nowadays DMCA (Digital Millennium Copyright Act) page also needs to be on your blog to protect your website content from being copied by any other person.
Also, it protects your blog from getting any copyright notices, if someone finds that you are copying or using their content on your blog then they will send you an email to remove it and if you are doing that thing, then just remove that content from your blog, and you will not be fined or get into any legal issues.
Now you might be thinking about how to create a DMCA page for your blog, then you don’t need to worry, just use this Free DMCA Page Generator Tool to create a DMCA page for your blog for free.
Further, if you planning to monetize your blog with Ad Networks like Google AdSense, Mediavine, AdThrive, or any other, then these pages need to be on your blog in order to get approval from those Ad Networks
So, I would suggest you keep these pages on your blog, and now let’s talk about the next and very important step which is adding your blog and sitemap to the webmaster tool and analytics.
Step 8: Connect Your Blog to Webmaster Tools And Analytics.
Connecting your blog to webmaster tools and analytics is also an important step, to track your stats, and how your blog is performing is very important for you to understand.
What are Webmaster Tools?
Webmaster tools allow us to monitor some important metrics of our blog like indexing status, crawl errors, search queries, and visibility of our blog on Search Engines like Google, Bing, Yandex, etc.
You need to submit your blog to some popular webmaster tools like:
Google Search Console: A webmaster tool by Google that allows you to monitor your blog’s metrics like search queries, indexing status, crawl errors, and much more, that will help you to grow your blog. But this is restricted to Google’s search engine only.
Bing Webmaster Tool: Just like Google Search Console this is a webmaster tool by Bing (Microsoft Product) that allows you to monitor the same metrics but for Bing’s search engine.
Yandex Webmaster: Just like Google and Bing this is a webmaster tool by Yandex, that allows us to monitor the same metrics for the Yandex search engine.
You can check out my guide on how to submit your blog and sitemaps to webmaster tools.
These three are the most used search engines all over the world and if you use these webmaster tools then the rest of the search engines automatically crawl your website.
But, in spite of these three, you can also use Baidu webmaster and Ahrefs webmaster tools to bring more traffic to your blog.
After you add your blog to these webmaster tools, you need to submit the sitemap of your website.
What is a Sitemap?
A sitemap is a file showing different information related to your blog’s pages, posts, images, videos, and other files.
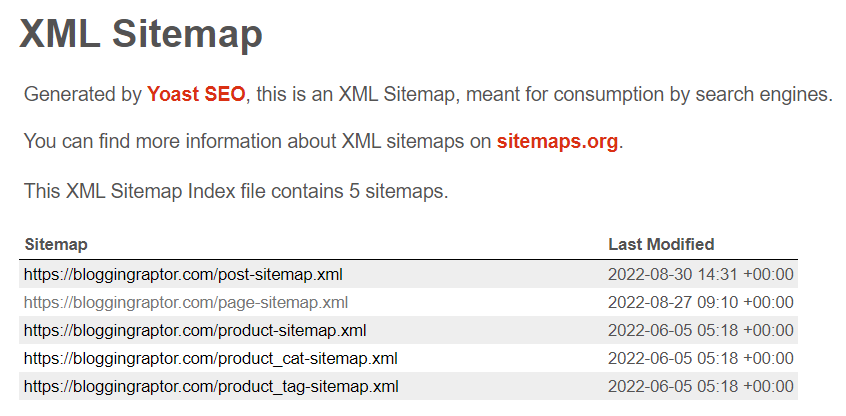
Or you can check Blogging Raptor’s sitemap here.
So that the search engine crawlers will crawl those new pages/posts and index them on the search engine.
After adding your blog and its sitemap to webmaster tools, next, you need to add your blog to Google Analytics.
What is Google Analytics?
Google Analytics is a web tool by Google, that helps us in measuring, track, and analyze different reports of visitors to our blog.
Now you might be wondering how to add your blog to Google Analytics. Well, it’s very easy, you can do that with the help of the Google Sitekit plugin or MonsterInsights plugin by following the instructions after installing the plugins.
But if you want to do it manually without any plugin, then you don’t need to worry as I have shared a detailed step-by-step guide on How to add google analytics to WordPress without a plugin.
Alright, till now you have successfully completed all of the basic setup and settings for your blog, we will talk about another most important step, i.e. researching some profitable keywords for your blog posts.
Step 9: Keyword Research for Your Blog Posts.
You might have heard the term keyword research from many bloggers, and this is a really important part, before writing a blog post.
Now you need to find out some low-competition keywords related to the topics that you have noted in step 2.
What is Keyword Research?
Keyword Research is the way or a process of finding the right keywords or search terms for our blog, website, or YouTube channel, that individual people use in Search Engines, for example, Google, YouTube, Bing, and Yahoo Search.
Why Keyword Research is Important?
The major two benefits of keyword research are
- It creates an opportunity to rank well in search engines for that specific topic.
- It impacts all of the other SEO work that you perform on your blog or its marketing, like on-page SEO, email marketing, or content marketing.
Well, I won’t talk about keyword research in detail as I have already shared an Advanced Keyword Research Guide on this blog.
I will suggest you create a list of low-competition keywords for each blog post and use those keywords in your blog post, it will help your posts to rank higher in SERPs and drive a good amount of traffic to your blog in the beginning phase.
But, It’s not only about finding and using low-competition keywords, you also need to do more research on it.
That’s why I will recommend you read my detailed step-by-step guide on How to Find Low Competition Keywords for your blog.
I hope you will be able to find the low-competition keywords and use them in your blog posts.
You can use some keyword research tools like Ahrefs, RaptorKit, or SEMRush
So let’s move to step 10, i.e. creating and publishing engaging content and optimizing them for search engines.
Step 10: Create Engaging Content and Optimize with On-page SEO.
After finding some low-competition keywords, now you need to create and publish some engaging content (posts/articles) for your blog for your readers and optimize them with proper On-page SEO.
In step 2 you noted down many blog topics on which you will write, now it’s time to create engaging content that your readers will love to read and spend more time on your blog.
Always try to add all the information in your articles that are needed, you must do proper research on the topic before writing that blog post.
How to Create a New Post in WordPress
Creating a new post is very easy, just follow the below-mentioned steps:
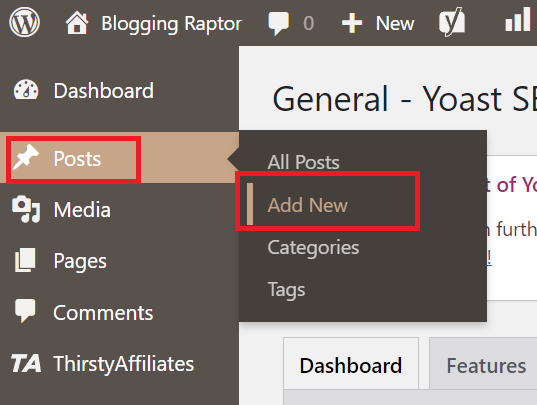
Go to the “Posts” section from the left side of your WordPress dashboard, and select “Add New”.
And then you need to add:

1. A catchy post title.
2. Your full engaging content.
3. Set the Permalink of your post (URL Slug).
4. Create/Add main categories.
5. Create/Add related tags to your blog post.
6. Upload a featured image for your blog post.
7. Finally publish your blog post and share it.
So you have written some awesome and engaging articles and published them on your blog, now the next step is to optimize your blog. Writing and publishing a post on WordPress is very easy, you don’t need to think much about it.
But when it comes to writing an SEO-friendly article, then it becomes very tricky, as a new blogger doesn’t know much about On-page SEO.
Yes, nowadays SEO (Search Engine Optimization) becomes really important for your blog to get more organic traffic as competition is increasing day by day, and everyone is trying their best to grab the top position on Google Search Result Pages.
How to Write SEO-Friendly Articles on WordPress
While writing SEO-friendly articles, we need to check out many aspects of a post/page like:
– Page Title
– Page Permalink
– Meta Description
– Headings and Sub-headings
– Images
– Internal and External Links, and much more.
Well, It’s a very wide topic and I have already published an awesome article on it. So, I would request you to check out my guide, On-page SEO: A Brief Guide to Rank Faster.
So, you can easily write a well-optimized article by following my On-page SEO guide, but still, you need to perform other practices, to rank your blog post easily and get more organic traffic to your blog.
Here I’m talking about Off-page SEO, and with this, we will move to our 11th step.
Step 11: Create an Online Presence: Off-page SEO
Till now, you have done all the important steps, you need to do some Off-page SEO for your blog.
What is Off-page SEO?
In simple words, Off-page SEO means all of the SEO actions that you perform outside your blog, and that directly or indirectly impact the rankings of your blog in the SERPs.
When we talk about off-page SEO, new bloggers only think about backlinks, that’s also important but it’s not restricted to backlinks only.
We need to build some domain authority and you can do it with the help of backlinks and other practices, also I have shared a Link Building: Professional Ways to Create Backlinks.
One bonus thing you can do that will really help your blog grow authority, is to make an online presence on social media sites.
Believe me, social media will really grow your site and it also creates authority, and makes your blog look more professional, as these days many people are using social media to connect with each other. You can use social media to drive extra traffic to your blog.
So do create social media accounts of your blog with the same username everywhere, like you can find official social media accounts of Blogging Raptor with the same username (@bloggingraptor).
You need to do the same thing as the same username, which makes it easy to find your official account. So do make the proper use of social media.
If you want to learn how you can do off-page SEO for your blog, then I have already shared a detailed guide on it. You will find different ways and techniques of doing off-page SEO in my Off-Page SEO Guide. So don’t forget to check it out.
Now let’s talk about some promotions, like where you can promote your blog, and how you can bring some traffic to your blog in the initial days.
How to Promote Your Blog
There are many ways both paid & free, through which you can promote your blog.
Free Ways to Promote Your Blog:
- Organic Traffic: Google, Bing, Yandex, etc.
- Q&A Sites: Quora, Google Question Hub, Yahoo Answers, etc.
- Forums: Reddit, Stackoverflow, Blogging Raptor Forum, etc.
- Social Media: Facebook, Instagram, Twitter, Linkedin, Pinterest, etc.
- Email Marketing: Share with your email list
- Guest Posting: Write guest posts on other blogs related to your niche.
Paid Ways to Promote Your Blog:
- Paid Advertisement: Google Ads, Facebook/Instagram Ads, Bing Ads, Mgid Ads, etc.
- Sponsorship: Pay someone to promote your blog on their websites or other social media.
- Paid Collaborations: Pay any big influencer in your niche to collaborate and promote your blog with his/her audience.
So, promoting your blog is an important step, now let’s jump to the next step which is one of the main reasons you are starting your blog.
Step 12: Monetize Your Blog with Professional Ways
Alright, you have done all the above-mentioned steps, now the last step is to monetize your blog, which means making passive income from your blog.
You are driving thousands of users to your blog every day It’s cool but it becomes cooler if you make some bucks with it too.
There are many ways you can use to monetize your blog, some mostly used are listed below –
- Ad Revenue/Network: Google AdSense, Mediavine, AdThrive, Ezoic, etc.
- Sponsored Advertisement: Get paid for promoting any product or service.
- Sponsored Guest Post: Get paid for posting a post for any product or service.
Try Adsy - Affiliate Marketing: Get paid for driving sales for any product.
- Selling Digital Products: E-Books, Images, Videos, Audio, etc.
- Selling Digital Services: Web development, Video/Photo editing, or any other freelancing services.
These are some ways to monetize your blog, there are several more ways but these are the most used and common ways.
Now let’s move on to the 13th and the final step of this guide, i.e. analyze and track your blog performance.
Step 13: Analyze And Track Your Performance.
So, you have done everything to start a successful blog, now the final step is to track and analyze your performance.
You need to track the performance of your blog after posting around 8-10 blog posts or after 2-4 weeks, and this is an ongoing process. This means you have to track and analyze your blog’s performance continuously
You might remember, that I told you in step 9 to connect your blog with webmaster tools and analytics, so now it’s time to use those tools and track your performance.
By analyzing and tracking your blog’s performance, you will be able to grab new opportunities like keywords, and blog post ideas.
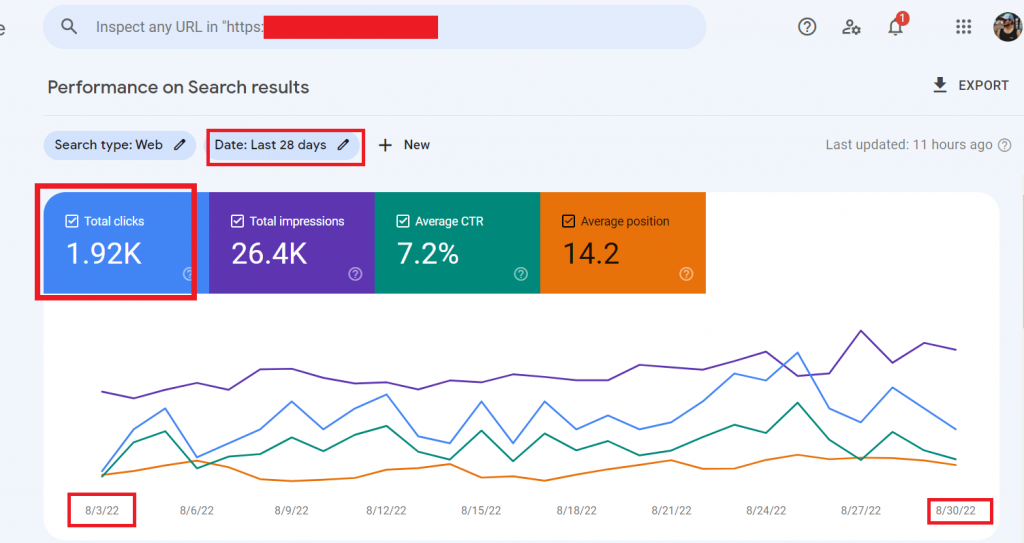
Below I have added a screenshot of the search console of the blog that is getting 2k visitors every month, which I was talking about at the beginning of this article.
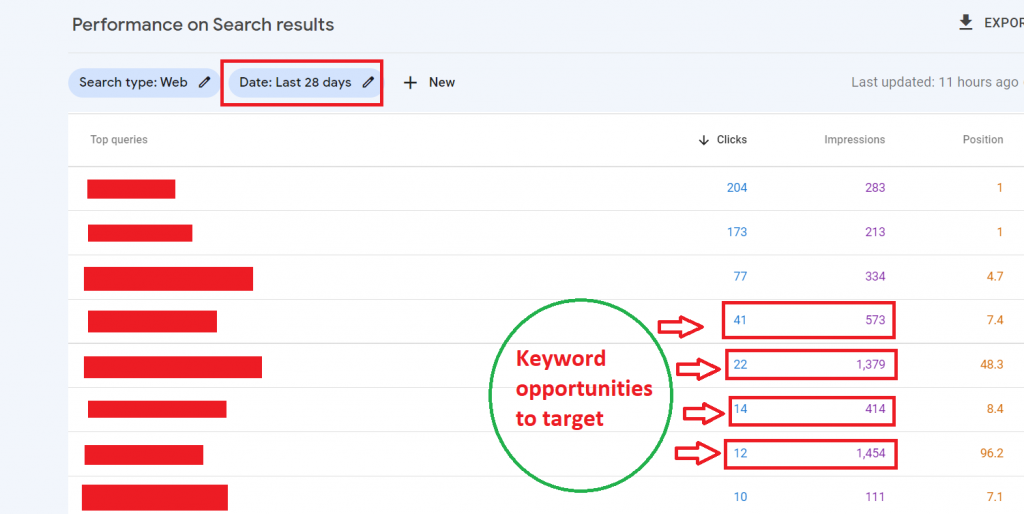
You can see in the above image that I’m getting a lot of impressions from those keywords but not clicks.
I can add those keywords to my existing articles on which I’m getting impressions, or if possible create a new article on those keywords.
So, it’s really important to track and analyze the performance of your blog, to know whether you are getting the results that you were looking for or not, and try to improve your performance as much as possible.
With this, you have completed all of the steps and you are ready to kickstart your wonderful blog as well as your blogging career easily.
Final Words
Alright, if you are still reading this then first of all I would like to congratulate you and wish you all the very best for your new blog, now you are able to start your new blog easily by following these steps without any problems.
Also, I would like to say that we have already discussed this at the beginning of this article about mindset.
Listen, you really need to know that blogging takes time, a minimum of 1-2 months for search engines to know that your blog exists. It may take at least 6-8 months to get some good organic traffic, stabilize your blog, and start some earning.
But, it’s not 100% true that you need to wait for 6-8 months, remember the quote that I shared with you at the beginning “Success can be achieved by anyone, just by following two words, ‘Hard Work and ‘Consistency’ “.
And if you have any doubts before starting your blogging career then do comment below, I will try to answer them as soon as possible.
I hope you definitely get success in the future, and you will be able to make a passive income with the help of this article.
So, I hope this article helped you to make any decisions regarding starting your blog, if you liked and found this helpful then do share it with your friends so that they also benefit from it.
Also, don’t forget to join my newsletter to get the latest updates of my all-new articles and tips straight into your mailbox for free.!!
Well, that’s all in this article and very very all the best!
Some Frequently Asked Questions
How do you start a blog for beginners?
Choose a blogging platform [WordPress], pick a domain name, and set up hosting. Then, install a content management system (CMS) like WordPress. Customize your blog’s design, create useful and engaging content, and promote your blog through social media and SEO strategies.
Do bloggers get paid?
Yes, bloggers can get paid through various methods such as advertisements, sponsorships, affiliate marketing, selling products or services, and more.
How do I start a blog with no experience?
Choose a niche, select a platform, purchase a domain, set up hosting, install a CMS, pick a theme, create content, optimize for SEO, and promote your blog.
How can I start a blog for free?
You can start a blog for free by using platforms like GoogieHost, WordPress.com, Blogger, or Wix.
Found this article really informative. Thanks for sharing.
Thanks Vishal keep reading ?
Thanks Shrey, This helped me alot, and yes I also want that Off page Seo guide if possible, it will be very helpful
I just randomly found this article while scrolling on twitter, and I ended with complete reading.
Man these tips are really amazing, thanks for sharing these steps, I definitely start a new blog by following these steps.
And I also want and Off-page SEO guide too, please share it ASAP.
Mahesh Bagade
Thanks Mahesh, for this valuable feedback. Sure I will definitely publish an article regarding Off Page SEO in some days. Stay connected for more updates
Cheers
Sure I will publish an article regarding it soon, Stay Connected!
Very nice article for a beginner as well as for an intermediate like me, found this very helpful.
Great work Shrey!
Thanks, A lot Robin for this compliment 🙂
Hey shrey i always read your blogs.
This blogs are very nice and informative. i try some blogs but no success then start reading your blogs and now i am eligible for google ads.
Thanks shrey for providing such a nice content.
i need your help in js will you help me.
i = 10;while(i) {document.write(”)}
I can’t understand how this js works please have a look bro.
Thank you for your amazing blogs.
I will always get stuck and this blog helps me alot.
your website is very nice i hope one day i will have this kind of website. thank you shrey.
Thank you so much for spreading this kind of great knowlege.
We will always appreciate your work.
Thank you once again.
Thanks for your valuable words, but I’m sorry as I don’t have any expertise in JS.
Just want to say Thanks a lot bro
This article will really help beginners in starting their own blog.you have mentioned all positive and negative expects tooo ……. keep it up sir, Thank you so much Shrey sir.
Welcome, Keep supporting
Nyc article bro
Thank you, Gurkirt 😊
Really enjoyed this post! You’ve explained everything in such a friendly way that even first-time bloggers can jump in with confidence. Thanks for making the process feel easy and fun.
Thanks
Wow! This guide is exactly what I needed to finally start my blog this year.
Thanks