Have you ever thought of how to start a blog on Instagram? and make some passive income from it? then this is the ultimate guide for you.
You might be thinking that creating a blog on Instagram is worth it or not.
I would like to say that there are many people who have created a blog on Instagram and making more than $1000 per month just from it.
For e.g: If you have more than 10,000 engaging Instagram followers on your account then you can make a minimum of $150 per sponsored post.
It sounds really good, but it’s not that easy to grow 10k followers, although not tough if you follow the below-mentioned steps correctly & consistently.
So without any further talks let’s discuss all the steps to start a blog on Instagram,
1. Selecting a Perfect Niche and Account Name for Your Blog
One of the most important steps before starting a blog on Instagram is selecting the best niche or category and account name for your blog.
It’s really important for your audience to know what content you are going to share on your Instagram account.
I have been using Instagram since 2016, and as per my experience, I have seen niche-related account tends to perform better and get more engagement on their posts compared to accounts with multi-niche or no category.
Also if your account has your own name, it performs well in comparison to brand names as your followers will know who is the person behind this account.
It also creates a personal connection with your audience, and also people engage more with a person, not a brand.
According to my experience, a niche account performs 20x or even 30x times better than multi niche accounts.
Here is the best example for the same:
One of my favorite influencers, Mya Nichol (an Instagram expert) shares content on how to grow on Instagram organically.
On the other hand, a brand account of Social Media Examiner shares content on growing your presence on social media.
The similarity between these accounts is both target social media apps.
But the differences are Mya’s account is a personal brand account that only targets a single niche that is Instagram, whereas Social Media Examiner is a brand account but targets all social media apps & websites.
See the comparison table below for a better understanding (as of 25th May 2022):
| Comparison Attributes | Mya Nichol | Social Media Examiner |
|---|---|---|
| Followers | 152.4k | 133.3k |
| No. of Posts | 1.2k | 1.8k |
| Engagement Rate | 2.60% | 0.08% |
You can easily see Mya has an engagement rate of 2.60% which is 2.52% more than Social Media Examiner.
So, this is the power of selecting a perfect niche and a perfect account name (try personal name) for your Instagram account.
2. Create a Creator Instagram Account
The next step is to create your Instagram account, well that is very much simple and I hope you have already done that.
If not then just visit the App or Play Store on your phone, install the Instagram app, and when you open it you will see a button “Create an Account/Sign Up“, just tap on it and follow the instructions.
Well you have created your Instagram account but that is not enough, you must have to change it to a creator account as you are going to do blogging on it.
Also, Instagram has lots of tools that will help you to grow your account faster and measure its performance.
To explain it better let me share some benefits of it.
Benefits of Instagram Creator Account
Here are some benefits of switching your personal account to a creator account:
-
Account Insights: You can track your account growth, your followers, content performance, and other metrics.
-
Profile Controls: You can show your category section which will be helpful for new profile visitors to understand the category of your account. Also share contact options like email & phone number, through which your audience can directly contact you.
-
Desktop Creator Studio: One of the best things about a creator account is you can check your analytics and other insights on the desktop with creator studio.
-
Messaging Controls: You will get two tabs (Primary and General) in your direct message box, where you can move your new message requests according to their relevance, an important message can be moved to the Primary tab, and less or not important messages can be moved to General tab.
-
Shoppable Posts: Again a top feature of the creator account is where you can add products on your posts through which you can sell your as well as other brand products via Instagram.
Let’s see how you can convert your personal account to a creator account,
How to Switch to Creator Account on Instagram?
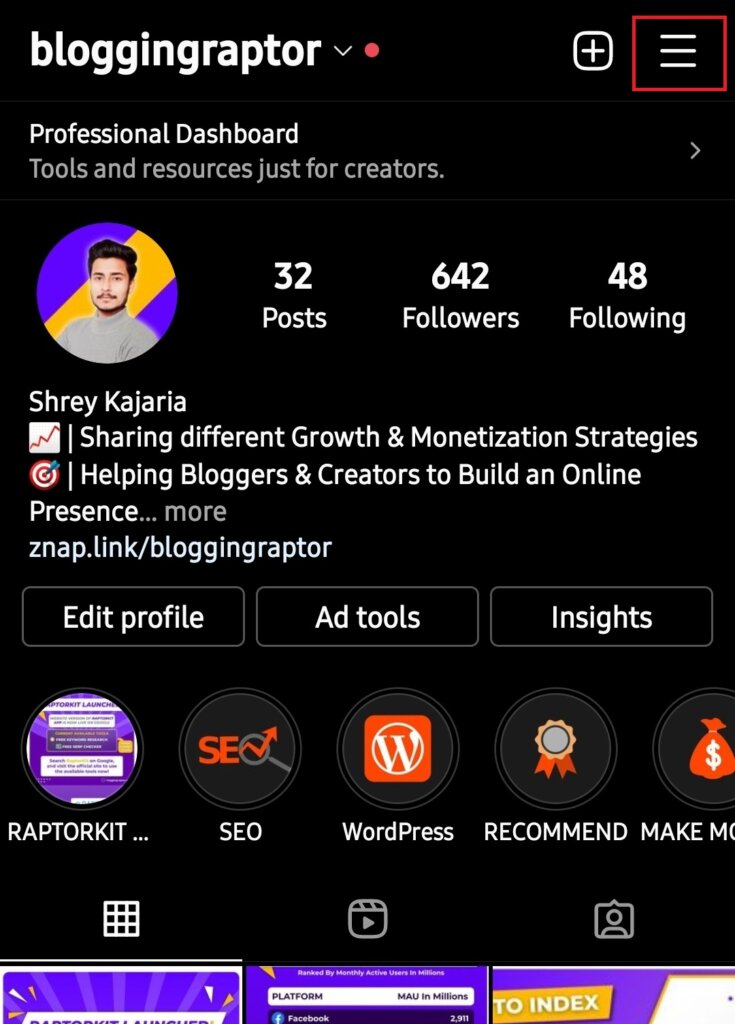
First, visit your profile page and tap on the menu/hamburger icon in the top right corner.
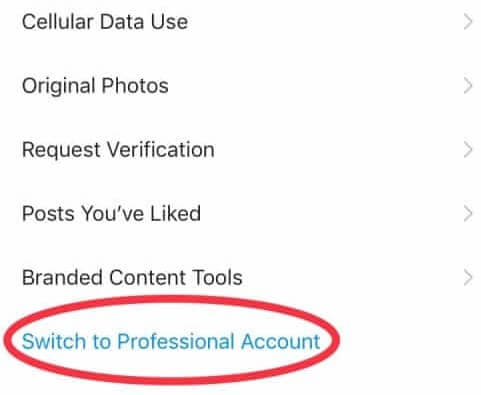
You will see an option “Account”, after that at the bottom of that screen you will see an option “Switch to Professional Account” just tap on it.
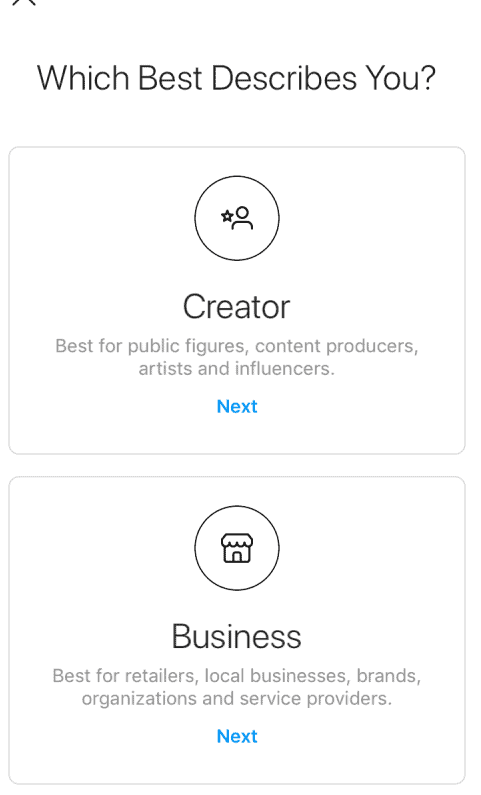
After that, you will be asked to select the type of account “Creator” or “Business”, and select whichever you want. In our case, we will select Creator as we are going to create an account for our blog.
Click the next button just under the Creator box then you will be asked to select the category of your account.
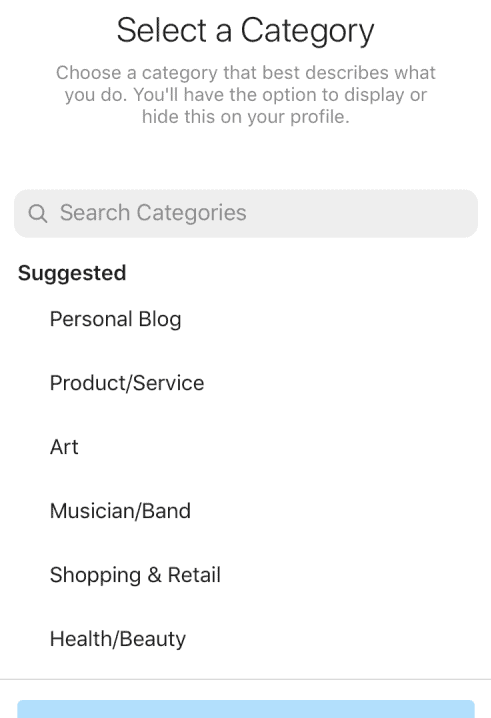
Choose the best category that describes which type of content you are going to share with your audience, then tap the Next button.
All done you’re account is now switched to the Creator account and ready to use those awesome Instagram tools.
3. Completing Your Instagram Account
After creating a creator account the next important step is to set up and complete your Instagram account.
What your audience will see when they visit your profile for the first time? your profile photo and bio right?
- Your photo must be clear and relevant to your account and your bio must tell the readers what is this account all about.
- After that, you must have a link in your bio where you can send your audience to a landing/conversion page to generate leads.
- Contact options like email or phone are also important as it will be easy for your audience to connect with you personally.
- You will share stories on your profile and you must create different story highlights related to each story also don’t forget to edit the highlight cover and match it up with your brand theme color.
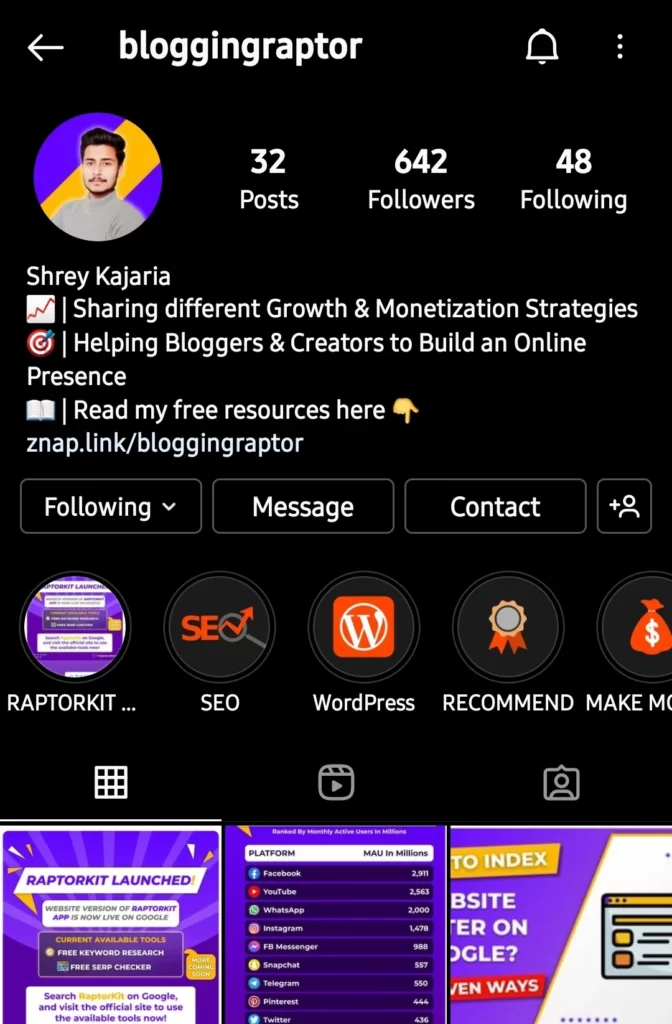
So, completing your account is very important, like profile photo, bio, website link, contact options, posts, and story highlights just like shown in the above image.
4. Planning & Scheduling Your Content
The next step is to plan your content, here you need to find out the content ideas for your account that would be shared on the account.
Creating a content plan and scheduling them will help you to take action faster and you will never get stuck in creating the next content.
Here is the best content plan checklist:
-
Prepare the next whole month’s content plan in advance that what you will share next month.
-
Creating the best captions for your posts, Instagram is a photo-sharing platform and people will engage with that only, but if they like your post then they will also check out the captions too.
-
Create, edit posts, and decide when to post them on your account.
So, this is a small checklist you need to follow to prepare a great content plan and schedule.
This will save your time in the future and you can invest that time in any other productive work.
5. Creating the Best Set of Hashtags
The next step is to create a set of hashtags. Hashtags are the best source of getting your post in front of the right audience.
Whenever a user engages with a photo on Instagram the algorithm gets to know which type of content this user likes.
If a user likes a post with #bloggingraptor then Instagram will show more posts related to that hashtag to that user on the home or explore page.
That’s why using the right hashtags in your post is really important.
You can use 30 hashtags in a single post on Instagram, but I would recommend you not to use more than 18 or 20 tags in a single post as it looks spammy.
To make your task easier and more effective, you can create a set of hashtags related to your niche.
As if you use the same hashtags in every single post then the Instagram algorithm assumes your post is spam, as you’re using the same tags.
That’s why I said to create a set of hashtags, here you can create different sets like 4-6 sets of tags with 20 tags in each set.
The set of tags should be created in this way to get the better results:
-
Select 6-7 tags with more than 10,000, but less than 50,000 posts in it.
-
Then 5 tags with more than 50,000, but less than 1,00,000 posts in it.
-
Select 5 tags with more than 1,00,000, but less than 3,00,000 posts in it.
-
And rest with more than 3,00,000.
This will help your posts to rank on low competition tags where there are less amount of posts.
And you will get more engagement from it that will rank for the medium as well as the high competition that has lots of posts.
You can repeat the previous hashtags in every set if they are related to your posts, but don’t overdo that.
It’s pretty simple that if you use different hashtags then you can target a wider audience.
Bonus Tip: Take the help of some free Instagram hashtags generator tools to make the best sets for your account, also don’t forget to add your own hashtag in every post, just like mine [#bloggingraptor].
6. Creating & Posting Your Content
So, you had created & completed your account, planned & scheduled your content, and created a set of hashtags.
Now, the next step to starting a blog on Instagram is to create and post your content with proper captions and tags with a proper Instagram content strategy.
Obviously, your account will grow only if you share some profitable content on it so that users will engage and like it.
The important thing is to stay consistent; every business in this world gets successful only after consistency.
Success can be achieved by anyone just by following two words, Hardwork and Consistency.
It’s really important to stay consistent while posting on social media at least twice a week.
And don’t forget to keep updating and engaging with your audience between those 2-3 days gap.
You can share stories of upcoming content, ask questions, poll, and live sessions, and share behind the scenes.
People love to interact and engage with real people, and it will create a personal connection with your audience.
7. Using Insights Feature to Track Your Performance
Okay, you had done each and every step perfectly, but there is an important task that many new Instagram creators don’t do is to track their performance.
Tracking and analyzing the result is a very important task for any business, Instagram has cool feature insights which is free to use but only available for creator & business accounts.
That’s why I told you at the beginning of this article to create or switch to an Instagram creator account.
Features of Instagram Insights
Highlights: You can analyze the performance of your account for up to the last 90 days.
Content You Shared: Content that you’ve posted and boosted across the feed, stories, and video
Overview: Number of accounts reached, accounts engaged, total followers, and approximate earnings (if applicable).
Total Accounts Reached: You’ll see demographic information on the accounts that you’ve reached or engaged, including countries, towns or cities, age ranges, and gender breakdown.
Total Followers: You can learn more about trends across your followers when you have at least 100 followers.
These insights include growth, top locations of your followers, age range, and times they’re most active on Instagram.
Content Interactions: What actions people take when they engage with your content, such as likes, comments, saves, shares, and replies.
Ads: This section will provide more information on your post if it’s been boosted.
Accounts engaged: This section includes the number of accounts that interacted with your content. You can also see this metric broken down into followers and non-followers.
So, analyzing your performance is also an important task if you want to start a blog on Instagram.
8. Engaging with Your Audience
Engaging with your audience is also really good for you and your account growth, it’s is a really interesting task to do and it has many benefits.
As said earlier interacting and engaging with your audience will create a personal connection between you and the audience.
They will feel special and interact with almost all of your content, they will like, comment, save, and share your posts on their stories.
It’s simple you will surely help your mates to get success in their life.
Similarly, if you interact personally with your followers then they will also feel special and help you grow.
Personally, I do this most on my YouTube channel, Telegram group, and Instagram.
I reply to each and every comment on my channel, replying to all my social media message requests and DMs.
9. Connect with Other Related Influencers
Well, to start a blog on Instagram you had done everything.
But one more thing that you can do is collaborate with other Instagrammers within your niche.
This is beneficial for both, as your followers will check your accounts and if you both share the same content then there will be an exchange of followers too.
You can share photos/videos/reels/ in collaboration and one of the best things is doing a live Q&A section together.
The collaboration will also increase your knowledge as you both will exchange your thoughts and experiences with each other.
Conclusion
Starting a blog on Instagram is a really great choice as it’s completely free and you don’t need to invest any single penny anywhere.
But yeah, there are many paid tools that you can use to boost your growth on Instagram but again it’s not compulsory as you can grow organically.
One thing I personally recommend doing is to create a landing page for you or your blog where you will share all of your links.
As Instagram only allows us to share one link in the bio, so it’s really important to create a page where you can keep all the important links on one page that you want to share with your audience.
Alright, I hope you understand each and everything in this article and it will help you to start a blog on Instagram.
So helpful post thanks ☺️
Welcome ☺️
Whenever I read your articles, I like them very much, keep writing such articles.How to make money on Instagram with 500 followers
Thanks Bhai.