Are you looking for WP Advanced Ads plugin tutorial, then your search is over!
If you are a website owner with thousands of traffic and having serious issues while displaying and managing ads and banners, then WP Advanced ads is the best WordPress ad plugin for you.
Managing advertisements is very easy when your site is new. But it gets pretty much difficult when your site starts growing as setting specific ads to the specific pages and users, analyzing ads statistics, and generating money are not easy. Therefore, you need a helping hand.

At this moment, there are several tools that can assist you to display, manage and generate revenue.
WP Advanced Ads WordPress plugin is one of those powerful tools that operate ads on your website and enhance their performance.
In this tutorial article, I will provide an in-depth tutorial on how to use this WP Advanced Ads plugin to place and manage ads effectively.
So, start scanning all the points with your full attention. 🤓
What is WP Advanced Ads Plugin
WP Advanced Ads is a very easy-to-use WordPress plugin that helps you manage your ads effectively and efficiently as it is very lightweight and offers tons of features.
Whether you are a beginner or advanced website user with thousands to millions of traffic, with the help of all those effective features of the WP Advanced Ads plugin, you can insert banner ads or code from any ad company.
Features:
WP Advanced Ads has some amazing features:
- Schedule Ads.
- AdSense and Google Ad Manager integration.
- Target specific user groups and pages on your website.
- A/B Testing
- Provide Real-time Stats: impressions and clicks.
- Fight ad blindness.
- Secure your accounts from fraud.
- Manage and show a limitless number of ads.
Plans:
WP Advanced Ads plugin has two plans:
- Free Version
- Premium Version
Here we will provide a step-by-step tutorial of the free version of it.
Why Use WP Advanced Ads Plugin?
Managing ads and banners and generating revenue gets easier when you use a plugin like WP Advanced Ads.
The reason is it simply adds small codes to your blog, maximizes the performance, and helps you earn money from ads on autopilot mode.
Here are some strong reasons why you must use WP Advanced Ads:
Free & Premium Version:
WP Advanced Ads WordPress plugin has both free and premium plans.
Its free version offers hundreds of features that any user can use to manage and maximize the ads to generate money.
You can easily download the free plan from WordPress.org and to get the premium plan, you have to visit their official website wpadvancedads.com.
Compatible with All Ad Networks:
Nowadays, website owners implement several ad networks on their blogs to generate more income. At that time, if a tool helps you to manage all the networks, it gets very easy for you.
Yes, this WP Advanced plugin works smoothly with leading ad networks such as
- Google Adsense
- Amazon
- Propeller Ads, etc.
Moreover, you can include your own ads like affiliate banners or direct ad sales.
Popular Ad Management Plugin:
Advanced Ads plugin is one of those trendy plugins on WordPress. Mostly, site owners implement this plugin to manage and maintain their ads.
- It is running on more than 50,000 WordPress sites.
- It has got 4.9-star ratings and 450 votes from users.
- This plugin is 100% safe as it is recommended by Google AdSense, WP Beginner, eBay, WP Rocket, AAWP & more.
Embed Ads Effectively:
Embedding ads to specific points in your area and allocating them to a particular placement gets simple when you utilize this tool.
Naturally, you can automatically place ads at any portion of your content like every third or fourth paragraph.
How to Install WP Advanced Ads Plugin
How to Install Free Version
To implement this effective plugin first and foremost you have to install and activate it.
You can easily install this plugin:
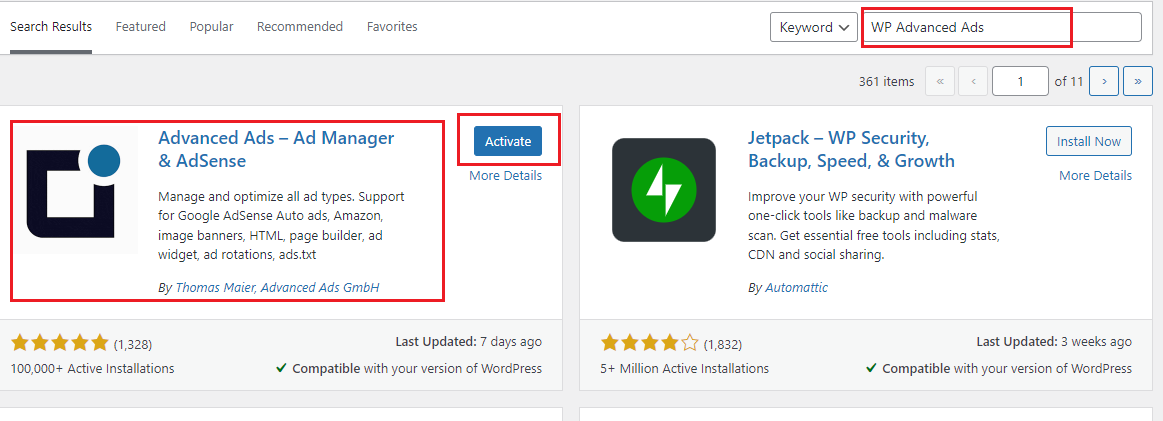
- From Your WordPress Dashboard:
Open Your WordPress Dashboard > Click on Plugins > Then Click on Add New > Then Click on the Search Bar and type “Advanced Ads” > Now Install & Active It.
See the screenshot:
How to Install WP Advanced Ads Pro Version
First, Just install the free version of the plugin from the WordPress plugins directory as shared in the above steps
To install the pro version first you need to purchase a premium license of this ad plugin from their official website.
Click the below button and avail the best discount!
After purchasing the premium license, visit your WordPress dashboard and follow the below-mentioned steps:
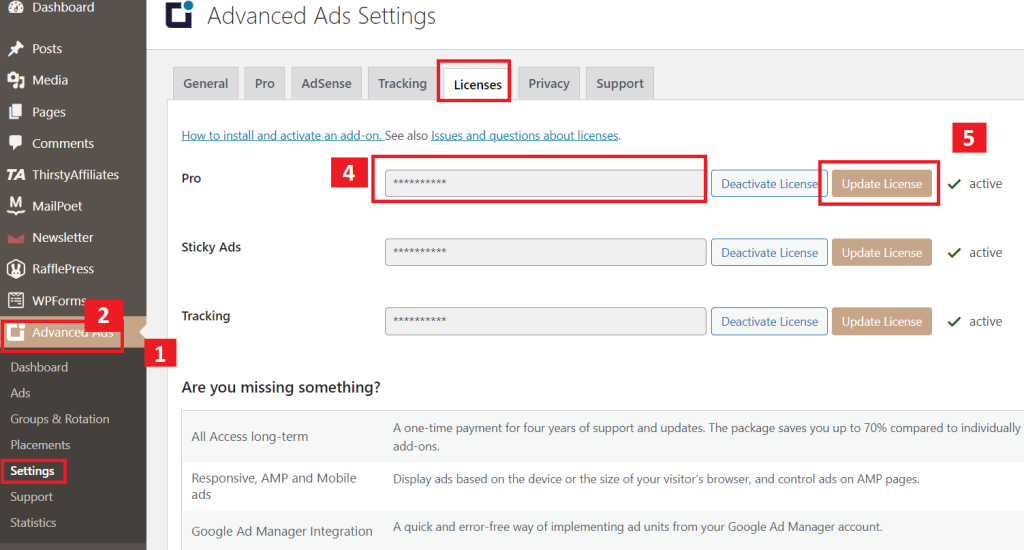
- Go to the Advanced Ads tab, and visit the setting tab.
- Click on the Licenses tab, and under it, you will see a section Pro.
- Now paste the license key that you have purchased from the official site, and hit the Update License button.
WP Advanced Ads Tutorial [Step-by-Step]
Now we will share a comprehensive guide so that you can make the most of this plugin to manage your ads.
Overview
- Dashboard
- Ads
- Groups and Rotation
- Placements
- Settings
- Supports
7. Statistics

Now, let’s explore all the features of the WP Advanced Ads Plugin one by one.
DASHBOARD
In the Dashboard area, you can join the newsletter program, their support, and other add-ons that come with a premium plan.

But you don’t need any of those premium features. Its free plan is enough.
So, simply head to the second option.
ADS: Creating And Managing Ads
Now we will show you how to create ads.
Creating a New Ad
Here you can see we have already created some ads. But we will create a new ad to teach you the process.
First, click on the Ads tab then click on New Ad, and give it a title, in my case I gave it YT Test.
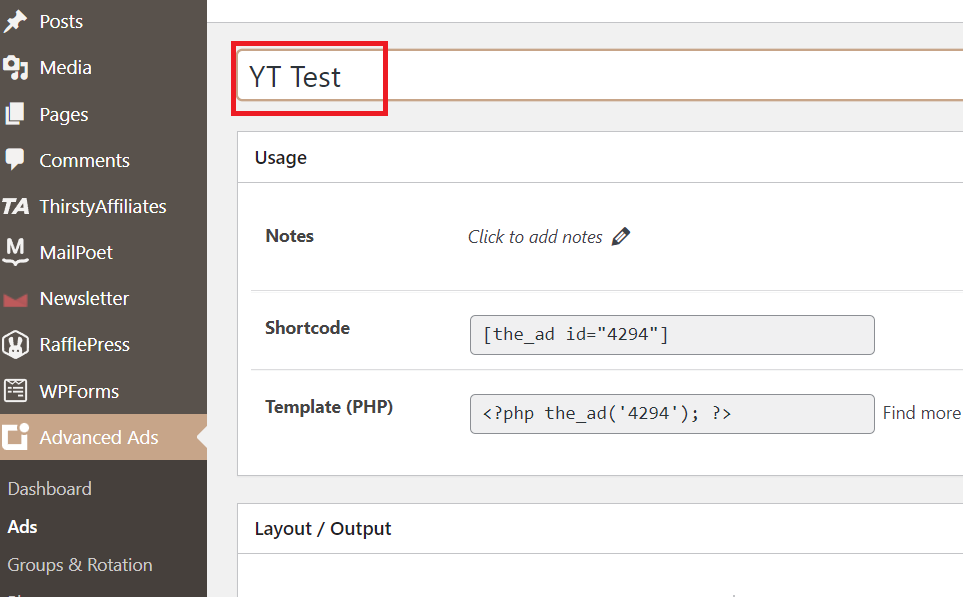
So, we have created a new ad, YT Test and now let’s customize this ad.
Usage Tab
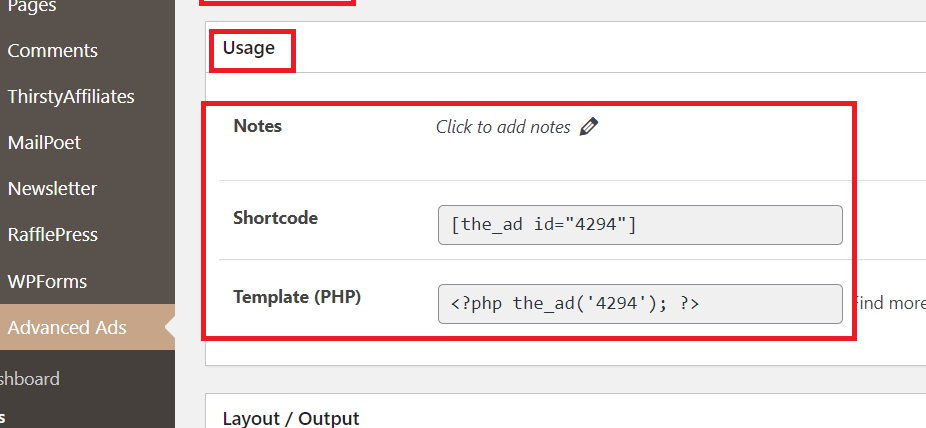
First, you will see an option for Notes where you can add some notes/texts/instructions for your understanding or your developer.
Second, you will see an option for Shortcode, this is a shortcode that you can use to place ads wherever you want in your posts/pages (not PHP files).
Third, you will see an option for Template (PHP), it also works the same as a shortcode, but this code only works in PHP files (not posts/pages).
In case you have to place ads in theme PHP files of your blog, for e.g the header.php file.
Layout/Output Tab
Text Flow
- Theme’s Default: This option will place AdSense according to the theme’s default settings.
- Float: This option lets you display sticky ads.
- Block: If you want to show ads in a particular place on your page, then you can choose this option.
Margin
By using this you will be able to give margin to the:
- Top
- Right,
- Bottom,
and the Left side of your ads.

Container ID & Container Classes
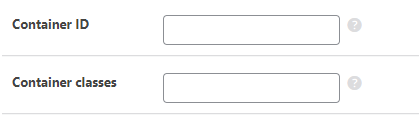
By using this option, you can add additional CSS to design your ads.
If you want to add some custom CSS then you can use it. This option is not important, so simply ignore this and jump to the next option.
Ad Parameters Tab
Here you have to paste AdSense’s ad unit HTML code.
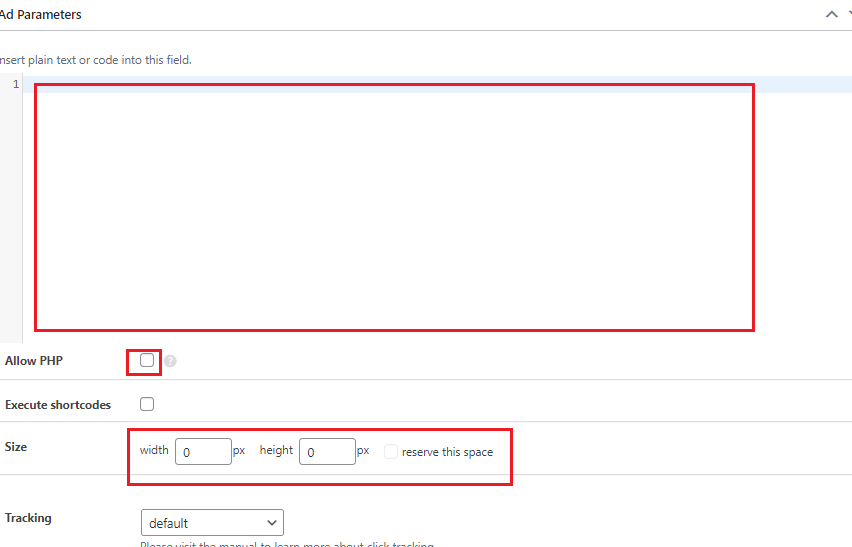
Allow PHP:
If you check this option, your AdSense code will work like PHP code.
Execute Shortcode:
If you check this, you will get a shortcode, and wherever you add that shortcode, ads will appear there.
Size:
Here you can create responsive ads. Also, you will be able to easily fix the size of your ads.
URL:
Let’s say you have an offer from a third-party company like Microsoft.
Now you want to add the link to that particular company’s landing page.
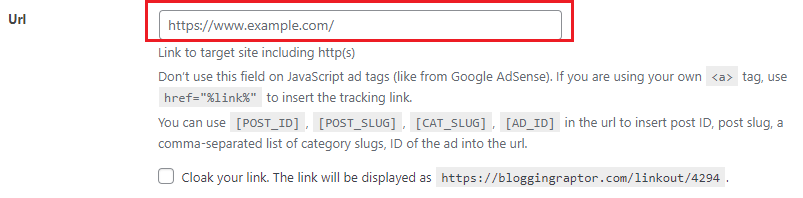
By using this option you will be able to add a link to that company’s product. Therefore, whenever your users click on those banners, they will land on that specific page.
Target Window:
Here you can set: When the users will click on those ads, whether those ads will be opened on the new window or on the same window.

Add “nofollow”:
Here you can make your link no follow or do follow.
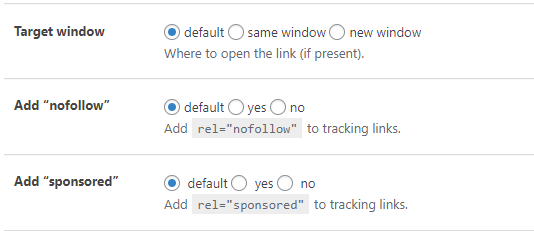
Add “sponsored”:
Here you can mark your ads as sponsored, so search engine crawlers can under that this is a sponsored link.
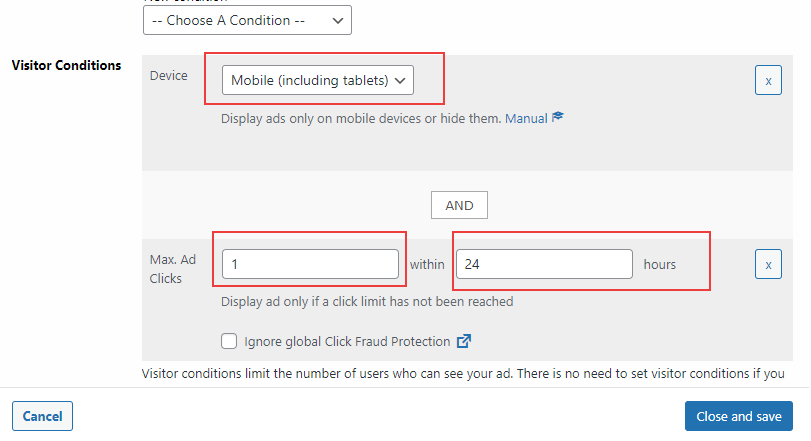
Visitors Condition
This option is one of the key and efficient features of this plugin.
Device:
If you want to show any ads only on mobile then you can select this option
- Mobile (including Tablets)
If only on a Desktop, then
- Desktop

After doing that, ads will only appear either on mobile, tablets, or Desktops.
Logged-in Visitor:
If you want to show ads only to those users who are logged in, then you can use this option.
You have to simply choose one of these two options.
- is
- is not

Maximum Ad Clicks:
This option protects your site from invalid clicks.
By using this feature, you can stop any particular user from clicking on ads multiple times.
Here you get two options:
- Max. ad clicks: Here you can set the limits of any particular ad. No one will be able to click after that limit.
- Hours: Here you can set the time duration when any particular user can click again on an ad after a specific time.
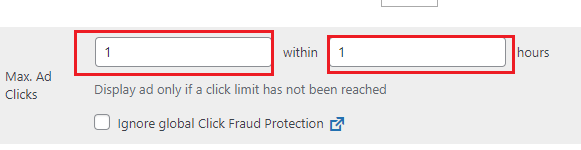
As a result, ads will not be displayed on that IP address, and you will get no issues related to invalid clicks.
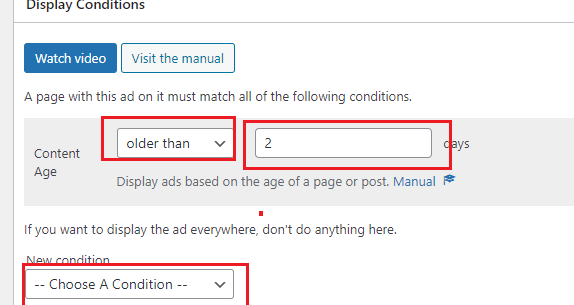
Display Condition
This option provides amazing features too. Here we have explained a few of them.
Content Age:
If you want to show ads to any particular post after 2 days after publishing that post, then you can select the “older than” option and put “2“.
Ads will appear on that post after 2 days.
Post Type:
If you want to show your ads to any particular post type:
- Post
- Page
- Media
- Custom layout
Then, you can select any option. And your ads will appear only on that post type.
URL Parameters:
By using this option you are able to show ads only on a particular URL.
- For example, you want to show ads on those URLs that contain HTTPS.
First, simply choose “contains”, Now simply type “HTTPS”.

Then ads will only be shown only on those URLs containing HTTPS.
Ad Type: Plain Text and Code:
You get these options under Ad Type.
- Plain text and code: You can paste your AdSense code.
- Dummy: Here you can check whether your ads are perfectly working or not.
- Rich Content: Here you can style your code and ads.
- Image ad: Here you can add and customize banner ads.
- Ad Group: Ignore this.
AdSense ad: Here you can connect your AdSense account.
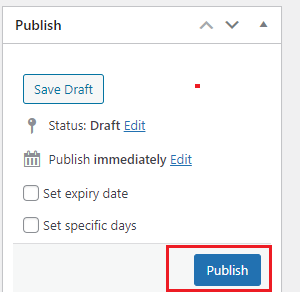
Now everything is done. Hit on publish button.
Groups And Rotations
Here you can create different types of ad groups.
For example:
Let’s say you are showing AdSense ads and getting good organic traffic. Now, an advertising company approaches you to place their ads in different locations on your site. Then, you can use the Placement feature to do that.
But, if you are getting many offers from different companies such as
- Hosting companies
- Domain companies
- Theme Company
- Website Builder Company
At that time, utilizing this group rotation option, you can easily create ad groups and display different ads multiple times.
- Example:
Let’s say you are showing ads for Microsoft.
Now, If you are getting offers to promote ads from Samsung, Dell, and Apple, then you obviously want to promote that advertisement.
Then what is the solution?
Yes, the solution is Group & Rotation.
How to Use Groups & Rotation to Create ads Groups?
First, we will create an Ad Group with a “Test” name.

Now we will edit our ad group which is “Test“.
Now we will select some ads that we have already created, in order to show how you can display multiple ads.
Here we have selected two ads. That is:
- BR Above Title [in-article]
- BR In-Article Ads Custom
Also, you can select as many ads as you want.

Type:
By using the type option you can show your ads to the users
- Randomly or
- Order wise.
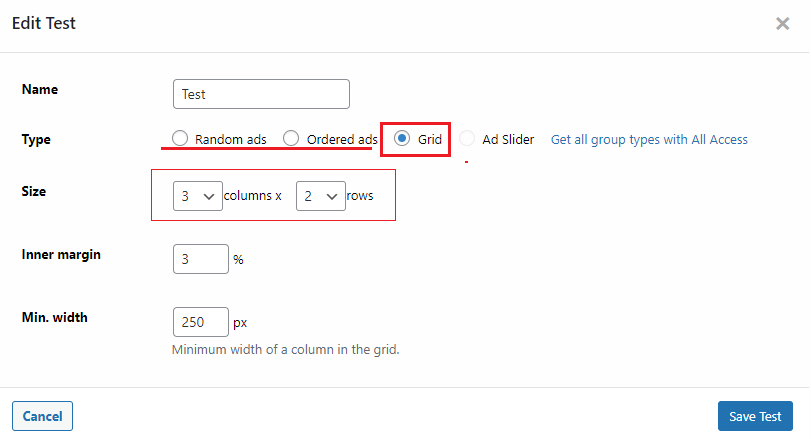
Grid:
By using this option you can set the size of your ads like
- Size of columns and rows.
- Margin.
- Width.

Moreover, if you want to place multiple ads column-wise in the sidebar area, then using the Size option you can do that.
You can see the screenshot.
Placements
By using this feature you will be able to display ads at any position on the page.
Even, you can use shortcodes to display ads manually.
Here are all those placements types:
- Before Content
- Into the Content
- After Content
- Sidebar Widget
- Manual Placement
- Header Code
- Footer Code
- Header Bar
- Footer Bar
- Left Sidebar
- Right Sidebar
- Left Bar
- Right Bar
- Background Ad
- Random Paragraph
- Above Headline
- Content Middle
- Custom Position
- Post Lists

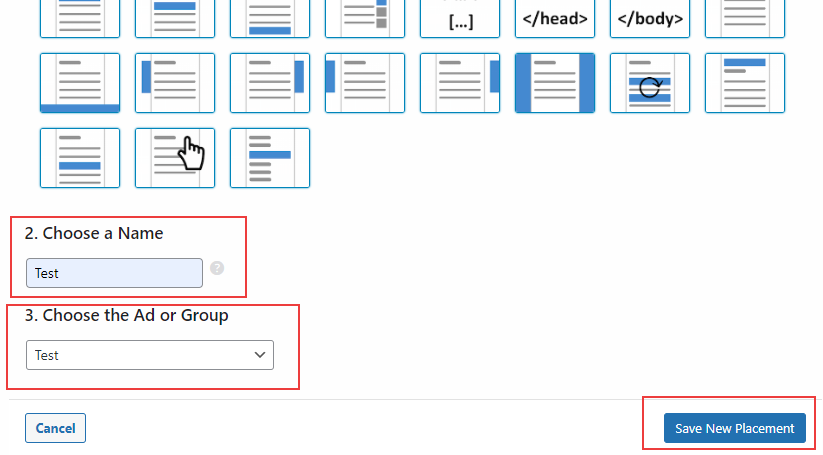
How to Create New Placement
Now we will show you how to create New Placements.
For that:
- Just click on New Placements

- Then Choose a Name: Here we have created “Test”.
- Next, choose the Ad or Group. We have chosen the “Test” ad Group.
- Now click on Save New Placement.
Options: Test ad Group
Ad Label: Here you can enable or disable the ad label.
Position: You can set your ads on the left right or center.

Inline CSS: You can add custom CSS here.
Display Conditions:
- Post Type: Under the Display Conditions, you will get so many options to customize your ads. Here you can select any post type like Posts, Pages, Media, etc, and display ads on them.

Visitor Condition:
Using this option, you can customize your ads for visitors according to your requirements.
Such options are:
- Device
- Post Type
- Post Content
- Tags
- URL Parameters
- Max Ad Clicks, etc.
Then, utilizing all these options click on Click and Save.
Settings
Now the third option is in Settings. Here, you don’t have to make a lot of changes either. There are only a few things to change.
Here are these:
General
Disable Ads
Disable All Ads in Front End:
Normally in Google AdSense, if you get impressions or clicks from one particular IP address over and over again, you get an ad limit.
So, when we check our website repeatedly in order to customize or fix any issues, we can get ad limit issues or sometimes ads stopped showing because those impressions are coming from the same IP address.
- At that time the best practice you can do is you can disable all ads in the Front End area.
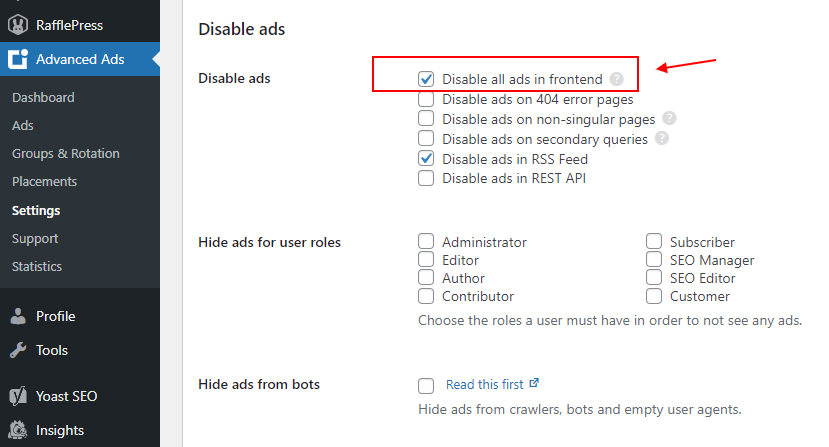
As a result, those ads will automatically get disabled on your browser after logging in to the admin panel of WordPress and there will be no ad limit issue.
Hide Ads for Use Roles:
Now, if you want to hide ads for any particular WordPress user like
- SEO managers
- Ad admin
- Ad manager
- author
- editor
- contributor or other
Then, you can use this feature efficiently.
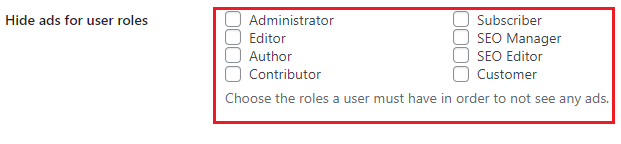
For that, you only need to check the boxes.
Hide Ads From Bots:

By using this feature, you will be able to hide your ads from search engine bots.
Disable Ads For Post Type:
Here you will be able to disable Ads to any particular post, page, or media where you don’t want to show any ads.

For example:
- You don’t want any ads on your homepage or on those sections where you placed affiliate links.
Then simply check these two options: Pages and Affiliate Links. Ads will not appear in those areas.
Layout Output:
Not all features are important here. Here you have to do a few minor changes.
- ID Prefix: Not important, Ignore this.
- Ad Label: If you want to display the “Advertisement” word on your ads, then you can check this option. Also, you can add any word manually.

It is totally up to you.
- Open Links in New Tab: If you want your ads to be opened on a new tab whenever your users will click on them, then you can check these boxes.
- Use advanced JavaScript: Ignore this feature.
Now Simply move to the Ad Blocker option.
Ad Blocker:
Though this option is not that important, you can use this feature to count how many users used ad blocker tools.
Ad Blocker Counter:
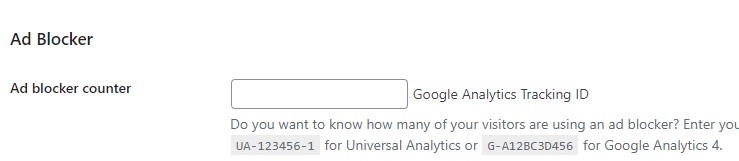
By utilizing this feature, you will be able to count all these visitors who have installed ad blocker extensions.
NOTE: I will ignore the Pro tab as it requires a premium version.
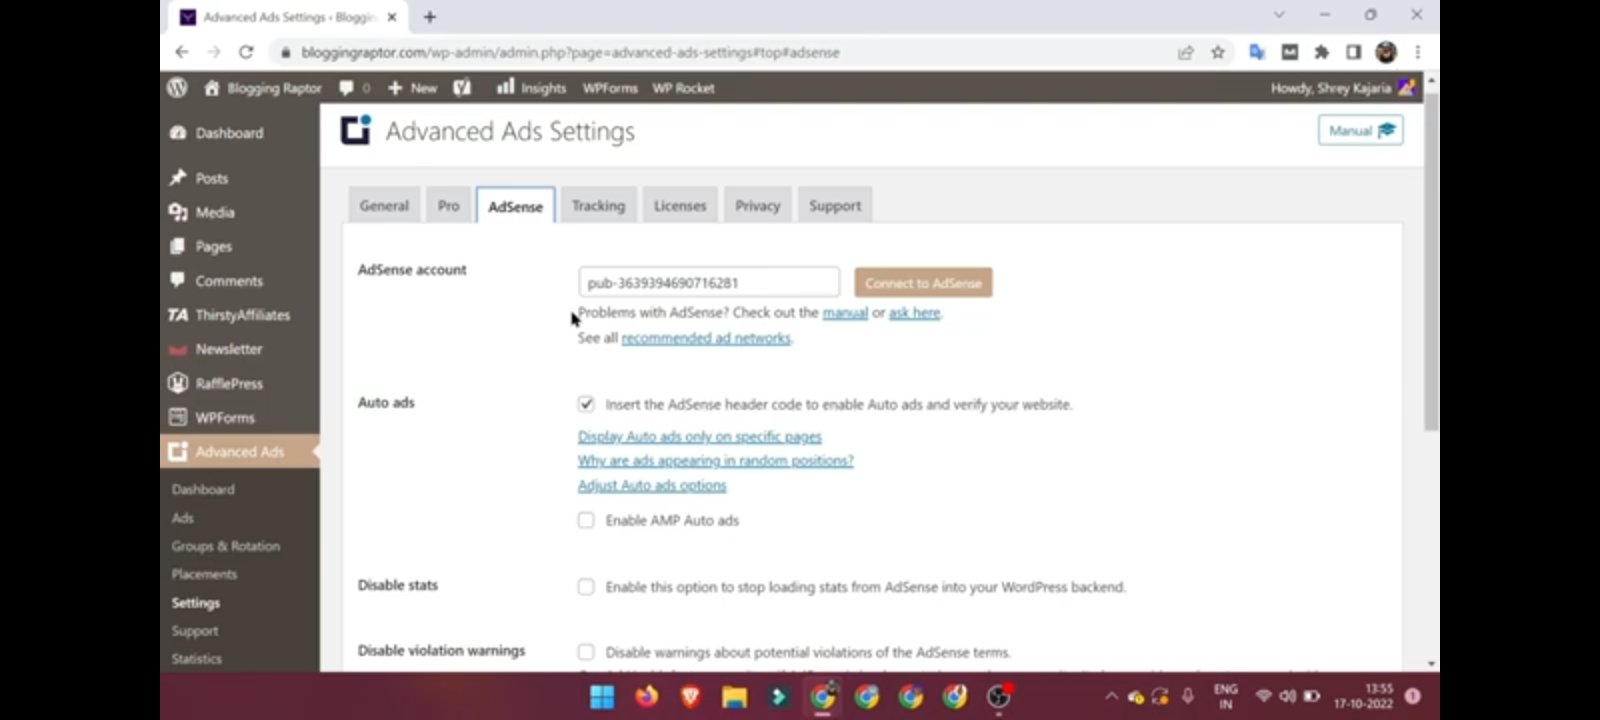
AdSense
Here you can connect your AdSense account and show all the stats of your AdSense on the dashboard area.
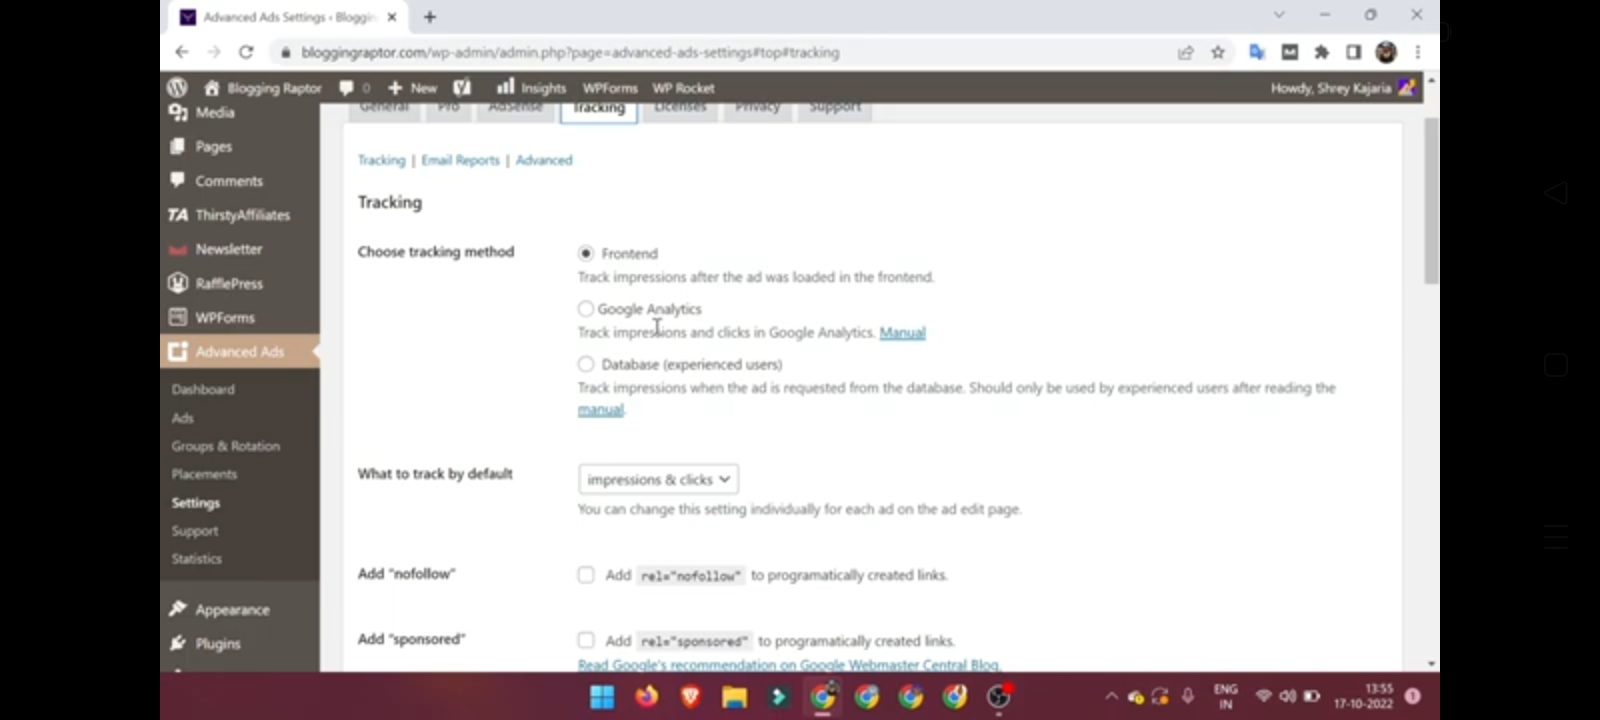
Tracking
You can choose any method to track your AdSense statistics like clicks, impressions, and CTR in these ways:
- in the Frontend area
- in Google Analytics
- from the Database
And ignore Licenses, Privacy & Support Tabs.
Support
In this option, you can directly contact them with the issues that you are having with this plugin.
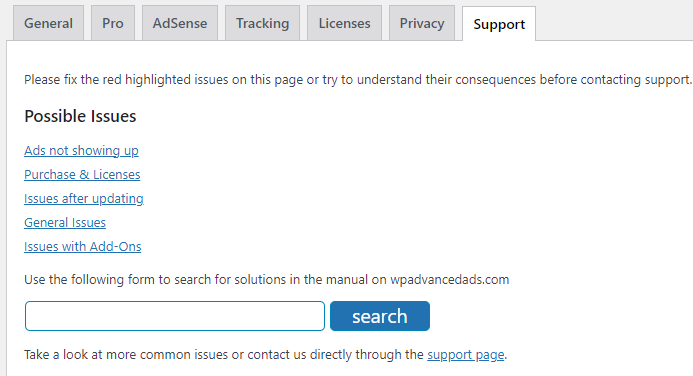
Also, they have provided some solutions to common issues beforehand that you might face like
- ads not showing up
- purchase and license
- issues after updating, etc.
Statistics
The last option is Statistics. As the name suggests, here you will get all statistics of your ads with dates like
- Impression
- Clicks
- CTR

Also, if you filter the time period, you will get the statistics of a specific period such as

- Last 7 days
- This Month
- Last Month
- This Year
- Last Year
That’s All!
In a Nutshell
So, we have created a full step-by-step tutorial on an Ads Placement WordPress Plugin that is WP Advanced Ads.
It is one of the best tools to manage your ads. Whether you are a non-technical or a very beginner on WordPress, it helps you to operate as smoothly.
Moreover, you can run multiple ads on your website, which is one of the best ways to generate money. But this is possible only when you use such an amazing plugin like that.
So if you have any questions or doubts, comment below. We will reply as soon as possible.
And if you are planning to purchase a premium license then below is the best offer for you.
Click the below button and avail the best discount!
You mention that one can do tracking from Tracking your AdSense statistics like clicks, impressions, and CTR in these ways:
in the Frontend area
in Google Analytics
from the Database
But can’t you have the same or better tracking from your own server stats? Just asking. Great post anyhow.
Well, I’m not sure about this. But if you have some coding knowledge then you may do that.